

Raspberry Pi's RP2040 microcontroller is an interesting piece of silicon, providing a balance of power and flexibility. It's also the first system-on-a-chip (SoC) device from the company, which up to now had been using off-the-shelf processors.
Based around a 133MHz dual-core ARM Cortex M0 running at 133MHz, it has 264KB of on-chip memory. Designed to be built into hardware, each chip also offers 26 GPIO pins, with a host of additional controller hardware including eight programmable I/O state machines.
As well as selling RP2040s to customers to build into their own devices (I have one that's a 4x4 LED backlit keyboard and another that's a customisable e-paper badge), Raspberry Pi uses it in its own Pico boards -- low-cost devices aimed at makers and other hardware hobbyists. As well as a RP2040, the Pico has an additional 2MB of flash storage for your code and the device's firmware. The device is a 21mmby 51mm circuit board, with 40 pins ready to be either fitted with header pins for use on a breadboard or connected directly to sensors and actuators.
Raspberry Pi recently introduced two new versions of the Pico with a third on its way later this year. The Pico H adds a pre-soldered set of header pins, intended for prototyping and experimentation, while the Pico W brings Wi-Fi to the board allowing you to use it for standalone connected applications. They'll eventually be joined by the WH, which adds headers to the W. As with the original Pico, the Pico W can be bought in bulk ready for use in commercial projects.
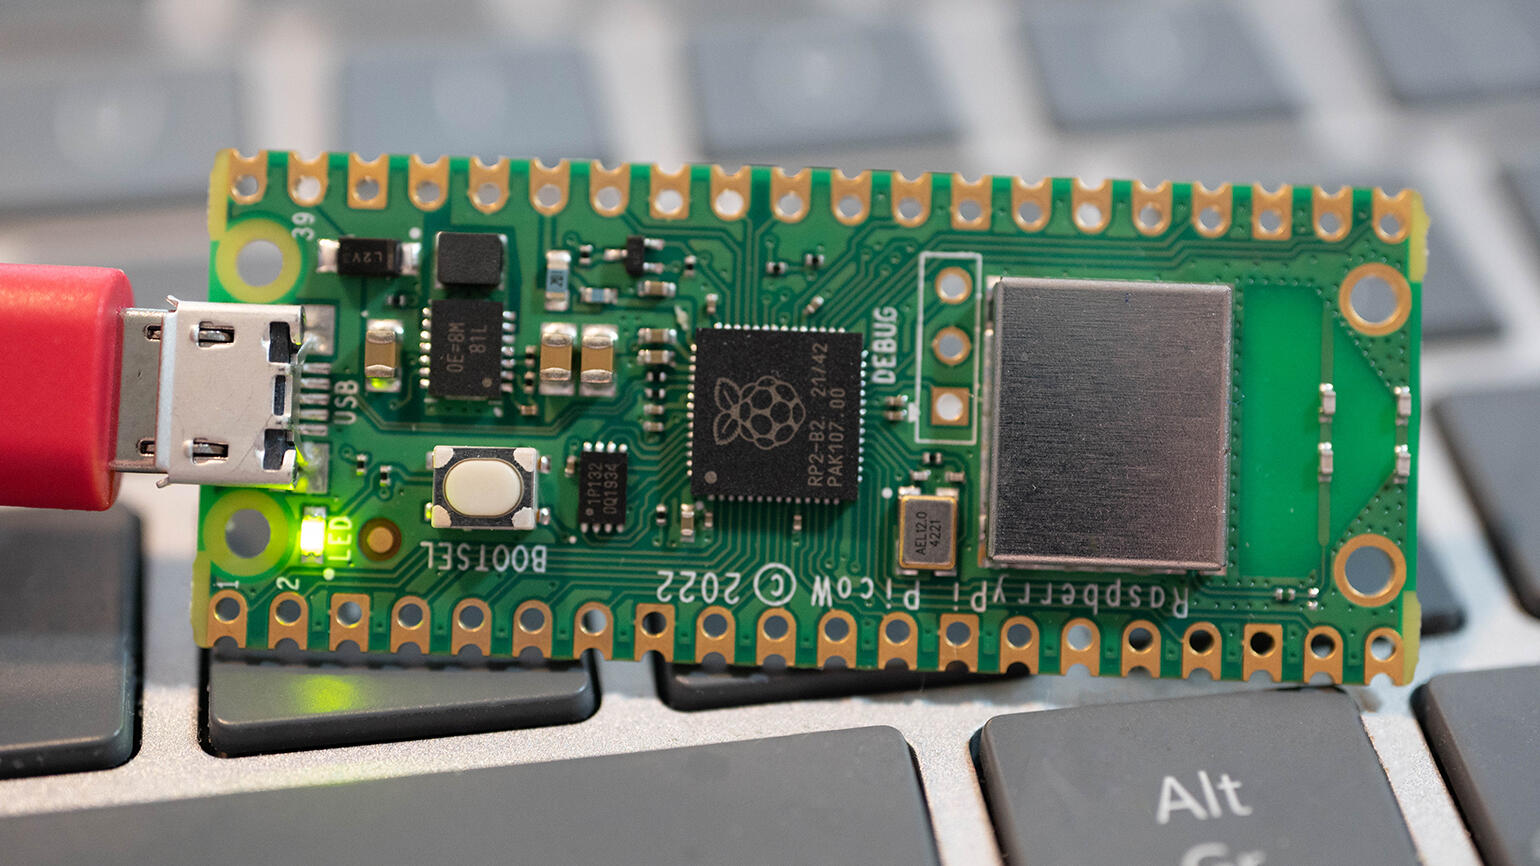
Raspberry Pi Pico W: the Infineon CYW43439 Wi-Fi chip under the silver case also supports Bluetooth, although this is not yet enabled.
Images: Simon BissonThe Pico W is a big change, adding a 2.4GHz 802.11b/g/n Wi-Fi chipset and an on-board antenna. That's all been done without changing the device's form factor, so you can swap a Pico W in for a standard Pico in existing projects. Like the standard Pico, power and basic connectivity go through a Micro-USB port, although you can also use the board pins to power the device, allowing you to wire it into cases and to use batteries as alternative power sources.
The chip used to add Wi-Fi to the Pico W, the Infineon CYW43439, also supports Bluetooth and Bluetooth Low Energy (LE). Although this first release only supports Wi-Fi, Raspberry Pi has noted that it might add Bluetooth support in the future. Currently the wireless stack is based on the lwIP TCP/IP implementation, using libcyw43 to control the wireless hardware. Usefully, Raspberry Pi has negotiated a free commercial-use license for the normally non-commercial libcyw43, so you can continue to build commercial hardware using the Pico W or even build your own boards around the combination of the RP2040 and the CYW43439.
There are some minor differences between the W and the original Pico beyond adding wireless support. The most obvious is that the onboard LED is no longer connected to the RP2040's GPIO pins, instead working through the Wi-Fi chip's own GPIO. If you've been using this in C or MicroPython as an indicator you'll need to change your code to take advantage of the new hardware options.
Raspberry Pi is forking its build of MicroPython as a result. You'll find separate builds of the firmware, so be sure to install the correct version for the Pico W. Raspberry Pi provides two development models for the Pico, using C to bundle your own code into its firmware, or working with Raspberry Pi's own firmware, which comes configured with MicroPython and includes most of the necessary modules.
You can develop for the Pico W using your desktop PC or Mac, or connect to it from a Raspberry Pi. I used a USB connection from a Windows PC, first installing by pressing the Pico W's BOOTSEL button to put it in download mode, installing the Raspberry Pi firmware by dropping the file in the Pico W's storage. Once it's installed, the Pico automatically reboots, using its USB port as a serial connection to your development PC or Pi.
You can use a terminal program to connect to the Pico W, using its MicroPython REPL to try out code (and for that Gen-X 8-bit computing nostalgia), but you're better off working with a MicroPython-ready development environment like the recommended Thonny. You can use this as a development editor as well as a way of installing Python code on your Pico.
Plug your Pico W into a development PC and launch Thonny. In the Shell pane under the editor, you'll see the Pico's MicroPython REPL where you can quickly try out code. Most of your work will be in the main editor, however.
Using the Pico W's MicroPython shell to scan for wireless networks.
Screenshot: Simon BissonThe first thing you're likely to do with a Pico W is try to connect it to a wireless network. If you're using MicroPython this is easy enough, using the new network module. Start by creating a wlan object, then set it to be active and use its connect method to connect to a SSID and password. Wait a little while and get the connection's configuration to see the current IP address, DNS server, and gateway addresses. Raspberry Pi's documentation contains a basic script to connect to your local Wi-Fi network. Other methods allow you to scan for nearby access points, as a quick test to see if your device is working.
So what can you do with a connected Pico W? Two useful MicroPython modules, socket and urequests, allow you to start communicating with external services via HTTP. You may well find urequests most useful as it supports sending and receiving JSON payloads to an external service. This approach gives your connected Pico W lots of options: it can receive messages from an application or return data to it. The ability to use JSON significantly increases utility, as your devices can now work with common webhook endpoints as part of industrial and home automation, plugging in to all manner of workflows.
SEE:The 5 best Raspberry Pi alternatives: Top single board computers
Connecting a microcontroller like this to a network removes many of its limitations, as it now becomes a leaf in a larger connected ecosystem. In a home it could automate your house plant watering, or in a garden provide sensors that help you decide when to harvest your fruit. Alternatively, you could use its PIO state machines in conjunction with the GPIO pins to drive actuators through your own external circuits.
There's even the option of building a simple MicroPython-powered web server on a Pico W, giving your hardware projects a basic dashboard. Here you'll need to use the socket module to listen for HTTP requests and respond as necessary. Your web server can be connected to external hardware, giving you a low-power way of extending devices to the web. It's probably overkill using sockets to build a web server with forms support for users to configure any applications, but adding HTTP support to code so users can upload configuration files makes a lot of sense.
There's a lot to like in the Raspberry Pi Pico W. It takes a familiar simple device and expands its utility significantly by adding networking. By giving you connectivity at low power, you don't need a hefty power supply -- you can run off battery power to build connected hardware that can run anywhere you can get a Wi-Fi signal.
At the same time, the default firmware and MicroPython makes it simple to build your own software, so it's an ideal prototyping platform for commercial products that use the RP2020 and the CYW43439. You can even take up the option of buying them in bulk from Raspberry Pi and including them in your own carrier boards.
A wireless Pico is a surprisingly powerful tool, and one I can wholeheartedly recommend. For just a few dollars you can build connected devices that can do, well, pretty much anything you can imagine. It's not often that devices bridge the gap between K-12 education and industry, but the Raspberry Pi Pico W is one that most definitely can. Now, what shall I build with mine?
Raspberry Pi Pico W specifications
| Dimensions | 21mm
|